
Introduction
In the construction industry, checking the quality of aggregates and sand is crucial to ensuring the quality of concrete. Often, sand delivered to a site may appear clean but can contain high levels of fine clay particles, dust, and silt. If such sand is used in concrete without testing, it can negatively impact the concrete’s strength, durability, and bonding capabilities.
This is why the Sand Silt Content Test is conducted. This test determines the quantity of particles smaller than 75 microns present in the sand. In accordance with IS 2386 Part 2, the test is performed using a washing method. The procedure involves washing the sand through a 75-micron IS sieve and calculating the percentage of fine particles washed away.
This test holds great importance in projects such as road and bridge construction, building foundations, RCC works, and drain construction. If sand with excessive silt content is used in drain concrete or bedding material, both water flow and structural stability can be compromised.
In this article, we will explore the Sand Silt Content Test in detail, covering its seven easy steps, permissible limits, calculation method, and practical applications at construction sites.
Objective of the Silt Content Test
The primary objective of the sand silt content test is to determine the quantity of particles smaller than 75 microns present in the sand.
This test informs the engineer whether:
- The sand is suitable for concrete.
- Excessive clay or dust is present in the sand.
- There will be any adverse effect on the expected strength of the concrete.
- The material is acceptable for drain construction and pavement works.
When the silt content exceeds the permissible limit, the bond between the cement paste and the aggregates weakens. This can lead to the development of cracks and reduce long-term durability.
Required Apparatus for silt content test
According to IS 2386 Part 2, the following equipment is required:
- The 75-micron IS sieve is the most important piece of equipment for this test; the washing process is carried out using this sieve.
- A balance is used to obtain an accurate weight of the sample; the balance should have an accuracy of at least 0.1 gram.
- An oven is used to dry the sample. Typically, the temperature is maintained between 100°C and 110°C.
- A water container is used for the washing operation.
- A tray and brush are used for handling and cleaning the sample.
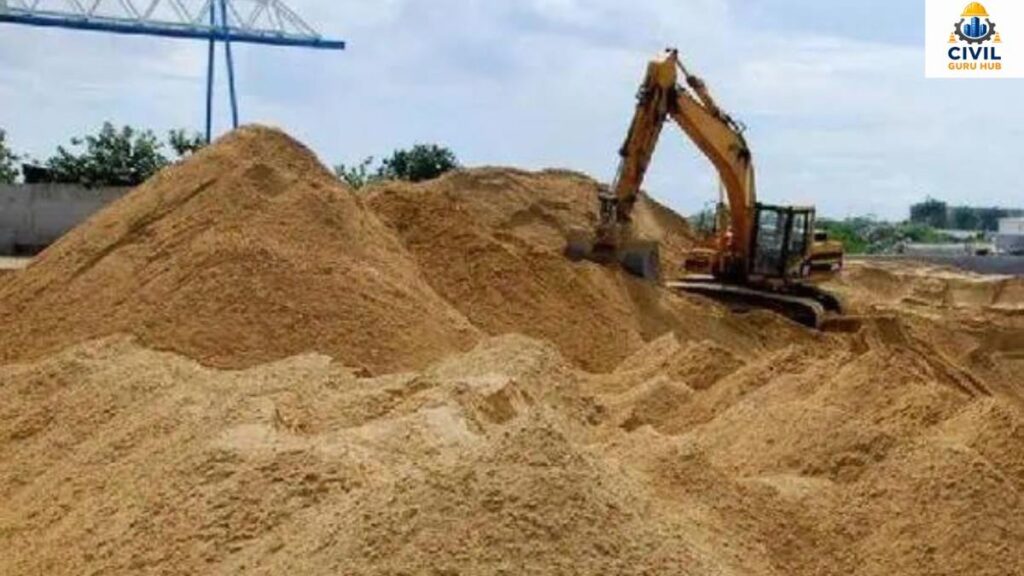
Step 1: Collection of Sand Sample (Silt content Test)
The first and most critical step in the Silt content test is collecting a representative sample. If the sampling process is flawed, the entire test result could be inaccurate.
It is often observed at sites that laborers or technicians collect samples only from the surface of the stockpile. This practice is considered incorrect because the material in the upper layer may differ from the material underneath.
To obtain a representative sample, material is collected from various locations across the stockpile. Samples should be taken from the top, middle, and bottom sections to ensure an accurate representation of the entire stockpile.
In road construction projects, aggregate and sand stockpiles are often very large. Similarly, in drain construction projects, bedding sand and concrete sand are stored in separate stockpiles. In both scenarios, representative sampling is crucial.
Preventing contamination during sampling is also essential. The sample should be free from grass, leaves, organic matter, or foreign materials. The presence of contaminants can lead to incorrect results in the washing test.
The collected sample is placed in a clean tray and mixed thoroughly. Subsequently, the required quantity is obtained using the quartering method or a riffle splitter.
In accordance with IS standards, the sample weight is determined based on the specific testing requirements. The quantity of the sample must be sufficient to allow for an accurate determination of the percentage after washing.
Using poor-quality sand in drain projects can lead to future issues regarding settlement and durability. Therefore, proper sampling should never be overlooked in silt content test procedure
Accurate sampling forms the foundation of accurate testing.
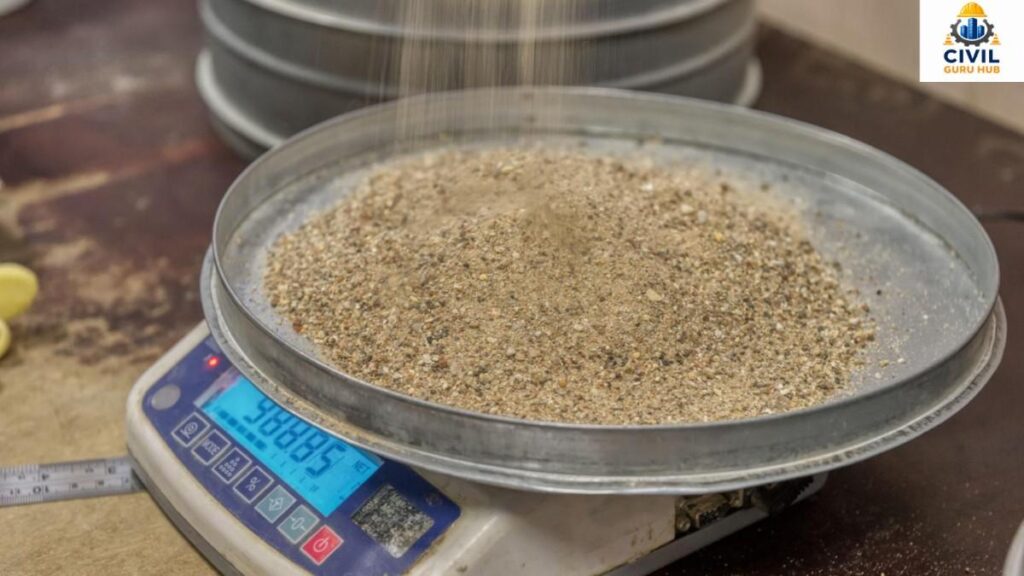
Step 2: Determination of Initial Dry Weight (Silt content Test)
After collecting a representative sample for silt content test, the next step is to determine its initial dry weight.
This step is crucial for calculations because the final silt percentage is derived from the difference between this initial weight and the final retained weight.
First, the sample is dried in an oven. The oven temperature is generally maintained between 100°C and 110°C. Drying continues until a constant weight is achieved.
The objective of the drying process is to remove moisture present in the sample. If moisture remains, the weight will be artificially inflated, potentially leading to inaccurate final calculations.
After drying, the sample is allowed to cool to room temperature. Weighing the sample while it is still hot is not recommended, as a hot sample can yield inaccurate readings on the weighing balance.
Once cooled, the sample is accurately weighed on a digital weighing balance.
Let us assume the initial dry weight of the sample is recorded as 1000 grams.
This value will be used as ‘W1’ for the calculations.
Large quantities of sand are used in road and drain construction projects; therefore, accurate weight records for every sample are maintained in the quality control laboratory.
It is also essential to maintain an observation sheet while recording weights. These records prove highly useful during future verifications and audits.
If the weighing balance is not calibrated, significant errors may occur in the test results which may affect the silt content test procedure. For this reason, the regular calibration of laboratory equipment is considered vital.
After determining the dry weight, the sample is ready for the washing process, where the actual silt and dust particles will be removed.
To get more about Lab tests, Click the below link and read the articles
What Are Deming’s 14 Principles of Quality Management? A complete Guide
What Are Atterberg Limits in Soil Testing? Easy Procedure in 9 Simple Steps
how to perform Proctor Test: 10 Easy Steps (Complete Guide)
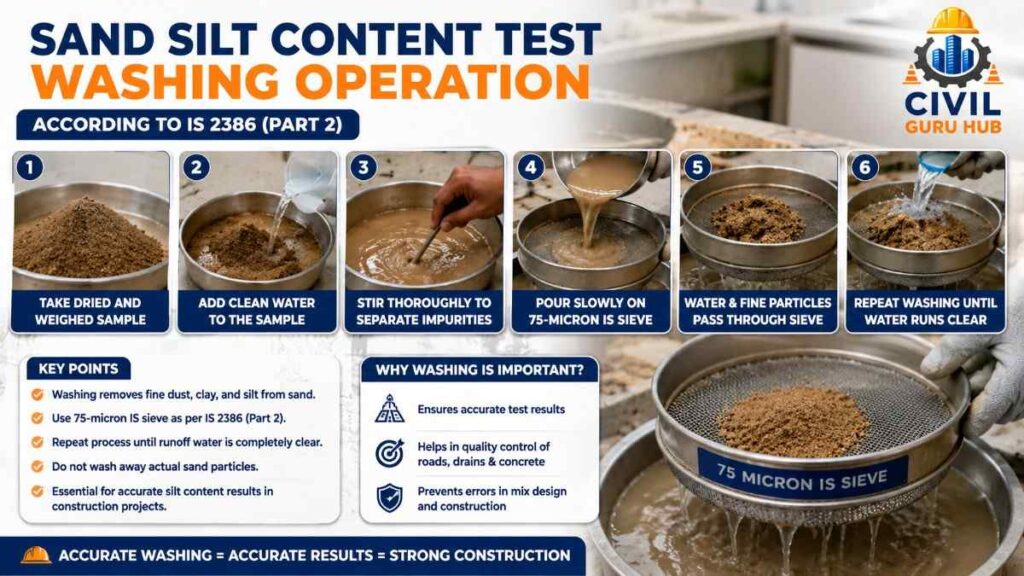
Step 3: Washing Process Using a 75-Micron IS Sieve (Silt content Test)
Now begins the most critical phase of the silt content test: the washing operation. In this step, fine dust, clay, and silt particles present in the sand are removed. According to IS 2386 Part 2, the sample must be washed over a 75-micron IS sieve.
First, the dried and weighed sample is placed in a suitable container. Clean water is then added to it. After adding water, the sample is stirred thoroughly to separate the sand particles from the fine impurities.
During stirring, clay and silt particles enter into suspension with the water. These particles are very fine and move easily with the water; this principle is utilized in the washing method.
Next, the slurry is slowly poured onto the 75-micron IS sieve. The water and fine particles pass through the sieve, while the coarse sand particles are retained on it.
For silt content test, This process is repeated multiple times. Fresh water is added for each washing cycle. Washing continues until the runoff water appears completely clear.
This step is of great importance in road and drain construction projects. If washing is not performed correctly, some fine particles may remain in the retained sample, leading to inaccurate final results and the silt content test may fail
During silt content test, care is taken to ensure that actual sand particles are not washed away as waste; only silt and dust particles should be removed. Therefore, the washing is performed in a gentle and controlled manner.
Silt content test is carried out daily in laboratories dedicated to drain concrete, culvert construction, and pavement quality control. Accurate washing is essential to guarantee an accurate result for silt content.
Step 4: Collection of Retained Material (Silt content Test)
The material remaining on the sieve after the washing operation is complete is known as “retained material.” This material consists primarily of clean sand particles.
This retained material is then carefully collected. The technician must exercise great care at this stage, as the loss of any portion of the sample could lead to incorrect calculations.
The retained sand is gently transferred from the sieve to a tray. A brush may be used during the transfer to ensure that particles adhering to the sieve are also collected.
Inexperienced technicians sometimes drop particles while transferring the sample in haste. This is a common laboratory error that can affect the final result of silt content test
Quality control reports are an integral part of contract documentation for road and drainage projects; therefore, careful handling of every sample is essential.
After collection, the retained material undergoes a visual inspection. This inspection provides the engineer with a preliminary assessment of the sand’s cleanliness.
If the retained material appears bright and clean, the washing operation is generally considered successful. However, if a clay coating is still visible on the material, further washing may be required.
At this stage, the collected material is ready for the next step, where it will be dried again and its final weight determined.
The collection of retained material is considered a critical quality control activity in testing programs for drain bedding materials and sand used in RCC concrete.
Step 5: Oven Drying of the Retained Sample (Silt content Test)
After collecting the retained material, it is dried in an oven. This process is essential for determining the final weight.
The sample becomes completely wet during the washing operation. If weighed while wet, the weight of the water would be included in the measurement, leading to incorrect calculations.
Therefore, the retained sample is placed in a laboratory oven. The oven temperature is generally maintained between 100°C and 110°C.
The sample is dried for a sufficient duration to ensure all moisture is removed. The drying period depends on the quantity of the sample and its moisture content.
The oven-drying process is also followed in field laboratories at drain construction sites. This ensures that test results comply with standard requirements.
Once the sample is completely dry, it is removed from the oven. Instead of weighing it immediately, the sample is allowed to cool down to room temperature.
The purpose of cooling is to ensure accurate weighing. A hot sample can yield unstable readings on the weighing balance.
In civil engineering laboratories, the drying process is treated with great importance because this step ensures the accuracy of the final calculation.
Without proper drying, the actual percentage of silt content cannot be determined.
To get more about Lab tests, Click the below link and read the articles
7 Major Types of Soil: A Complete Guide step-by-step
what is Juran’s Trilogy of Quality : Explained Simply
what is Fly Ash:A complete guide step-by-step.
Step 6: Final Dry Weight Measurement (Silt content Test)
By this stage, the retained sample is completely dry and has cooled to room temperature; its final dry weight is then determined.
The sample is placed on a digital balance, and the accurate weight is recorded. This weight is generally denoted as W2.
For instance, if the initial dry weight was 1000 grams and the retained dry weight recorded after washing was 940 grams…
It implies that 60 grams of fine particles were removed during the washing process.
The material removed consists mainly of silt, clay, and dust particles that could have otherwise affected the quality of the concrete.
Determining the final dry weight is a crucial part of the quality assurance process in roadworks and drainage construction projects.
If the weighing balance is properly calibrated and the sample is handled carefully, the result obtained is considered highly reliable.
The observed weight is entered into the laboratory record sheet. These records are maintained for future reference and quality audits.
An accurate final weight serves as the basis for calculating the silt content.
Step 7: Silt Content Calculation
The final step of the test is the calculation. The silt content percentage is determined through this calculation.
Formula:
Silt Content (%) = ((W1 – W2) / W1) × 100
Here,
W1 = Initial Dry Weight
W2 = Final Dry Weight After Washing
Example:
Initial Weight (W1) = 1000 grams
Final Weight (W2) = 940 grams
Silt Content (%) = ((1000 – 940) / 1000) × 100
= (60 / 1000) × 100
= 6%
In this example, the silt content of the sand is 6%.
After the calculation is complete, the result is compared against permissible limits to determine the suitability of the sand.
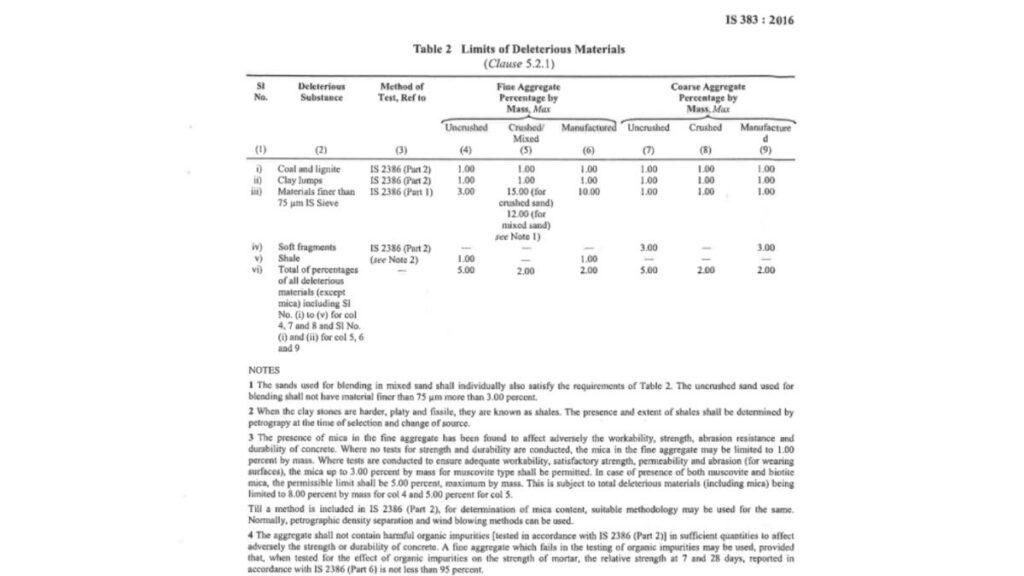
Permissible Limits According to IS 383:2016 Standards
The permissible silt content in sand depends on project requirements and specifications.
Generally, excessive silt content is not considered acceptable for concrete work.
If the silt content exceeds the limit:
Concrete strength may be reduced.
Bonding may be weakened.
Water demand may increase.
The likelihood of shrinkage and cracking may rise.
In drain construction projects, sand with excessive silt can lead to future durability issues; therefore, testing and quality control are crucial.
Natural Sand = Max 3%
Crushed sand = Max 15%
Mixed Sand = Max 12%
Common Mistakes During Sand Silt Content Test
Certain common mistakes are observed during field and laboratory testing.
- Improper sampling is the most common error.
- Washing is often incomplete.
- Some technicians lose the sample.
- Sometimes, the weighing balance is not calibrated.
- Weighing a moist sample can also lead to errors.
Accurate test results can be obtained only by avoiding these mistakes.
Best Civil Engineering Tools for Silt Content Test
Some important laboratory equipment and testing tools are required to perform the Sand Silt Content Test correctly as per IS 2386 Part 2. These equipments make sample collection, weighing, washing, drying and final calculation accurate and reliable. If you are a civil engineering student, laboratory technician or site engineer, the equipment given below will prove to be extremely useful for successfully performing this test. Most of these tools are routinely used for laboratory testing, quality control and construction material inspection.
The following table shows the essential equipment required for performing the Sand Silt Content Test using the 75 Micron Washing Method.
You can buy these products by clicking the following links given in below table.
| Sl. No. | Product Name | Purpose |
|---|---|---|
| 1 | Digital Weighing Balance | Accurate sample weight measurement |
| 2 | 75 Micron IS Sieve | Sand Silt Content Test |
| 3 | Hot Air Oven | Sample drying process |
| 4 | Laboratory Test Sieve Set | Multiple aggregate testing applications |
| 5 | Safety Gloves | Laboratory safety |
| 6 | Lab Apron | Personal protection |
| 7 | Measuring Beaker Set | Water measurement and handling |
| 8 | Sample Storage Container | Sample collection and storage |
Conclusion
The Sand Silt Content Test is considered a crucial laboratory test for quality control in the civil engineering and construction industries. The durability, strength, and long-term performance of any construction project depend largely on the quality of the materials used; therefore, assessing the content of silt, clay, and dust particles in sand is essential. Conducted in accordance with IS 2386 (Part 2), the “75-Micron Washing Method” enables engineers to accurately determine whether the sand is suitable for concrete and other construction applications.
Excessive silt content in sand can weaken the bond between cement and aggregates, thereby compromising the concrete’s compressive strength and durability. This directly impacts the service life of structures such as buildings, roads, bridges, and drainage systems. Consequently, laboratory testing of construction materials prior to site use is regarded as a best practice in engineering.
A key advantage of this test is that it is both simple and highly reliable. When representative sampling, proper washing, oven drying, and accurate weighing are performed according to standard procedures, the results are highly trustworthy. This allows for the easy identification of poor-quality sand, helping to minimize future structural issues, cracking, and maintenance costs.
The Sand Silt Content Test is routinely employed for quality assurance in road construction, RCC structures, bridge foundations, culverts, and drainage projects. Therefore, civil engineers, site engineers, laboratory technicians, and quality control professionals should possess both theoretical and practical knowledge of this test. Proper testing and material selection form the foundation of success for any construction project.
About Author
My name is Susanta Kumar Mohapatra, and I am a Civil Engineering professional with over 11 years of practical experience in the construction and infrastructure sectors. I have done B.Tech in Civil Engineering and an M.E. degree in Construction Management. Throughout my professional career, I have worked in key areas such as road construction, bridge projects, quality control, material testing, estimation, project planning, and site management.
My interest in civil engineering extends beyond just fieldwork; I am passionate about sharing technical knowledge in a simple, practical manner with students, engineers, and construction professionals. With this aim, I launched CivilGuruHub.com, where I publish detailed articles on practical civil engineering insights, laboratory tests, highway engineering, building construction, quantity surveying, project management, and the latest industry practices.
My goal is to provide civil engineering students and working professionals with information that not only aids in exam preparation but also proves useful in real-world construction projects. All the information shared on this website is based on my academic background, industry experience, and practical site exposure.
If you are interested in topics related to Civil Engineering, Construction Management, Material Testing, Highway Engineering, or Infrastructure Development, Civil Guru Hub is a reliable learning platform for you. I am committed to providing accurate, practical, and industry-relevant content to help you elevate your career and knowledge to the next level.
Susanta Kumar Mohapatra
B.Tech (Civil Engineering), M.E. (Construction Management)
11+ Years of Experience in Civil Engineering & Construction Industry
Founder & Author – CivilGuruHub.com
Affiliate Disclaimer
Some articles, reviews, and recommendation pages published on CivilGuruHub.com may contain affiliate links. This means that if you purchase a product or service by clicking on an affiliate link, we may receive a small commission at no extra cost to you.
We strive to recommend only those products and tools that are useful and relevant for civil engineering, construction, laboratory testing, and professional use. Recommendations are based on our personal experience, research, or the product’s utility. However, it is your responsibility to independently verify the specifications, features, warranty, and suitability of any product before purchasing it.
The primary objective of CivilGuruHub.com is to provide useful and high-quality information to civil engineering students, engineers, and construction professionals. Affiliate partnerships help support our content creation, website maintenance, and educational resources. However, these affiliate relationships do not influence the accuracy, impartiality, or quality of our content and recommendations.
We may participate in the Amazon Associates Program and other affiliate programs. As an Amazon Associate, we may earn commissions from qualifying purchases. This does not result in any additional cost to you regarding the product price.
If you have any questions regarding affiliate links or recommendations, please feel free to contact us via the ‘Contact Us’ page.
CivilGuruHub.com – Providing Educational Content for Civil Engineering Professionals and Students.
FAQs – Sand Silt Content Test (75 Micron Washing Method)
1. What is the Sand Silt Content Test?
The Sand Silt Content Test is a laboratory test used to determine the quantity of silt, clay, and dust particles smaller than 75 microns present in the sand. This test is considered crucial for evaluating sand quality in concrete and drain construction.
2. Why is the Sand Silt Content Test conducted?
This test is performed to enable engineers to determine whether the sand is suitable for concrete. If the silt content in the sand is high, it can adversely affect the strength, bonding, and durability of the concrete.
3. According to which code is the Sand Silt Content Test conducted?
In India, this test is performed in accordance with IS 2386 Part 2. This standard outlines the procedures for testing the physical properties of aggregates.
4. Why is a 75-micron sieve used in this test?
A 75-micron IS sieve is used to separate fine particles. During the washing process, silt and clay particles pass through the sieve, while the clean sand is retained on it.
5. What are the disadvantages of having excessive silt in the sand?
Excessive silt content reduces the bonding between cement and sand. This can lower the compressive strength of the concrete, increase water demand, and raise the likelihood of crack formation.
6. What is the importance of the Sand Silt Content Test in drain construction?
If the sand used in drain construction contains excessive silt, the quality of the concrete lining and bedding material can be compromised. Therefore, this test is frequently conducted before material approval for drain projects.
7. What is the formula for Silt Content?
The formula to calculate Silt Content (%) is:
Silt Content (%) = ((W1 – W2) / W1) × 100
Here, W1 is the initial dry weight, and W2 is the final dry weight after washing.
8. Can the Sand Silt Content Test be performed on-site as well?
Yes, there are some preliminary field methods available; however, for accurate and reliable results, performing the 75-micron washing method in a laboratory in accordance with IS 2386 Part 2 is considered more appropriate.
9. Can the test be performed directly on wet sand?
No, the sample must first be oven-dried, and its initial dry weight recorded. Dry weight is crucial for accurate calculation.
10. Why is it important for Civil Engineers to learn the Sand Silt Content Test?
Civil Engineers need to have knowledge of material quality control. The Sand Silt Content Test helps them assess concrete quality, approve materials, and ensure the durability of drain, road, and building projects.