
Introduction
Soil Proctor Test is a very important laboratory test in civil engineering which determines the compaction characteristics of soil. The main objective of this test is to find out the Maximum Dry Density (MDD) and Optimum Moisture Content (OMC).
Whenever we work on road construction, embankment, foundation or any earthwork project, proper compaction of soil is very important because compaction directly affects the strength and durability of the structure.
In India, engineers generally perform this test as per IS: 2720 Part 7 (Standard Proctor Test) and IS: 2720 Part 8 (Modified Proctor Test). In road projects, the MoRTH Specification (Ministry of Road Transport and Highways) clearly defines compaction requirements in Clause 305 and 306.
This article explains the entire process step-by-step, so that you can develop both practical and theoretical understanding.
To read Both codes for Proctor test click on given link, It is only for reference
Step 1: Soil sample collection and preparation
The first and most important step is the proper collection and preparation of the soil sample. If the sample itself does not properly represent the actual site conditions, the test results will also be inaccurate. Therefore, while collecting soil from the field, we take care to ensure that it is representative, meaning it should be of the same type of soil that will be used at the actual construction site.
After we bring the soil to the laboratory, we air dry it. This means that we keep the soil in an open environment so that its natural moisture is reduced without affecting its properties. After this, we gently break the soil to remove the lumps. An important thing here is that we should not crush the soil particles, only break the lumps.
As per IS 2720, we sieve the soil, generally passing through a 19.5 mm sieve for light compaction and 37.5 for Heavy compaction depending on the conditions. We remove or correct oversized particles.
As per the MoRTH specification, we follow very strict soil preparation for the subgrade and GSB layers. If we do not prepare the sample properly, the compaction curve will be incorrect and the MDD and OMC will also be incorrect. Therefore, we consider this step the foundation of the entire test.
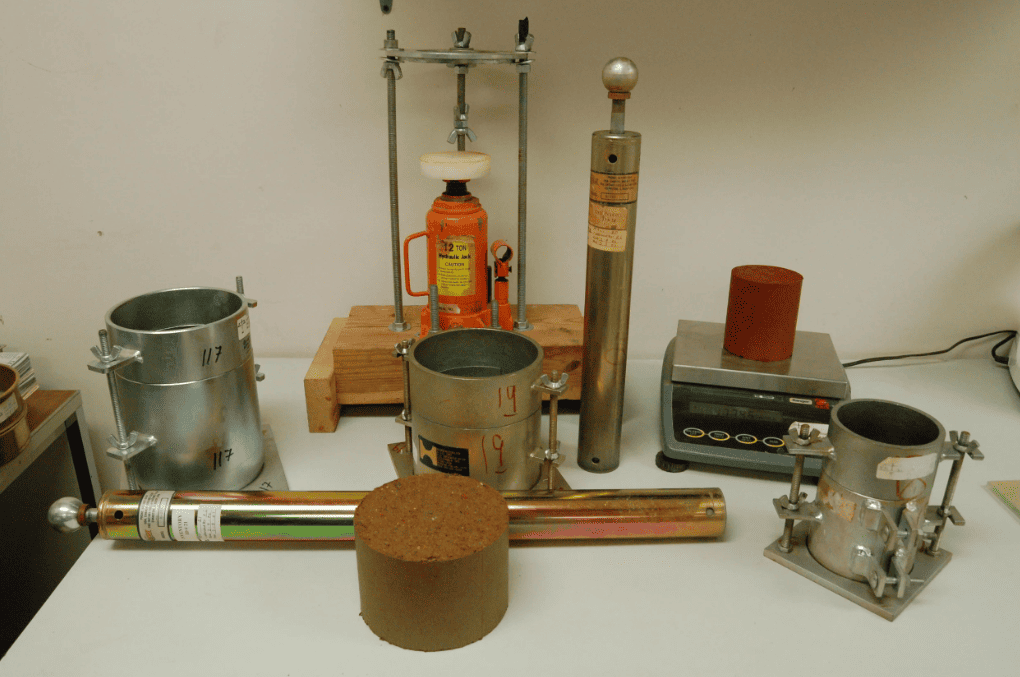
Step 2: Apparatus Setup and Calibration
In this step, someone prepares the required apparatus for the test. The main equipment for the Soil Proctor Test includes a Proctor mould, rammer, base plate, collar, weighing balance, and oven. In the Standard Proctor Test, technicians use a 2.6 kg rammer which they drop from a height of 310 mm, whereas in the Modified Proctor Test, they drop a 4.9 kg rammer from a height of 450 mm.
The mold has a fixed volume, which is generally 1000 cc for light compaction and 2250 cc for heavy compaction. Accurate measurement is very important because the density calculation depends on it. Someone must properly calibrate the weighing balance so that the weight measurement is accurate.
It is important to clean and dry all the apparatus before starting the test. If moisture or dust is in the mold, it can affect the results. Calibration means that all equipment is in proper working condition and meets standard values.
The MORTH specification also clearly states that someone must properly maintain and calibrate laboratory equipment, otherwise test results will not be acceptable. Field quality control also focuses on this point.
Step 3: Moisture Content Adjustment
In this step, we add the required amount of water to the soil sample. Initially, we prepare the soil at a low moisture content, and then we perform the test at different moisture levels by gradually adding water.
It is very important to mix the soil thoroughly while adding water so that the moisture is evenly distributed. If the moisture is uneven, the compaction result will also be uneven. After mixing, we allow the soil to rest for some time so that the water is properly absorbed.
We perform compaction by varying the moisture content in each trial as per IS 2720, and we calculate its dry density. We repeat this process until we achieve peak density.
We generally perform field compaction around the OMC according to the MORTH specification, so it is crucial to determine the accurate OMC in the laboratory. This step directly influences the final compaction curve.
Step 4: Filling Soil into the Mould
The prepared soil is now filled into the mold. In the Standard Proctor Test, the soil is filled in three equal layers, whereas the Modified Proctor Test utilizes five layers. The thickness of each layer should be approximately equal.
The primary objective of filling the soil in layers is to ensure uniform compaction. If a layer is excessively thick or thin, the compaction energy will not be distributed properly. The workers fill the soil loosely, without applying any pressure, in order to maintain its natural state.
According to IS 2720, each technician subjects each layer to a specified number of blows. In the Standard Test, technicians apply 55 blows per layer; the Modified Test also involves 25 blows, but the compaction energy applied is higher.
This step ensures that the compaction process is both realistic and repeatable. In MoRTH projects as well, workers carry out compaction in layers; thus, the laboratory procedure effectively simulates actual field conditions.
For better idea about civil quality control read the following blogs.
7 Major Types of Soil: A Complete Guide step-by-step
what is Juran’s Trilogy of Quality : Explained Simply
FDD test: what is it? complete process and calculation.
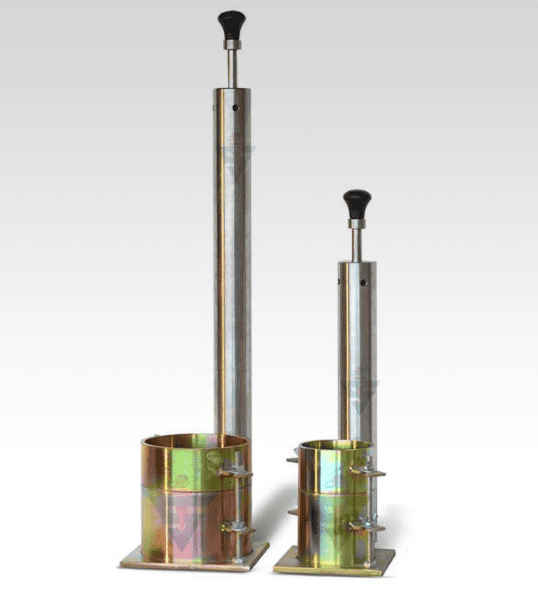
Step 5: Compaction Using Rammer
In this step, the soil is compacted using a rammer. The 2.6 Kg rammer is dropped from a specified height of 310 mm for Light compaction and 4.9 Kg rammer is dropped from a specified height of 450 mm for heavy compaction and an equal number of blows are applied to each layer.
The Standard Proctor Test involves lower energy levels, whereas the Modified Proctor Test utilizes higher energy levels; consequently, the results obtained from the Modified test yield a higher density. The rammer must be dropped in a vertical direction, and a uniform distribution of blows must be maintained.
During the compaction process, care is taken to ensure that the blows are distributed evenly across the entire surface. If an excessive number of blows are concentrated in a single area, the resulting density will be uneven.
In accordance with MoRTH specifications, field compaction is carried out using specific equipment—such as rollers—with the objective of achieving the Maximum Dry Density (MDD) determined in the laboratory. Therefore, this step is directly correlated with actual field performance.
Step 6: Removal of Collar and Trimming
Once compaction is complete, the team removes the collar of the mold and trims away the excess soil. It is essential to ensure the surface is perfectly level so that the volume remains exact.
The technician performs trimming carefully using a straight edge. If any excess soil remains, or if they remove too much, the volume will change, resulting in an incorrect density calculation.
According to IS codes 2720, the volume of the mold is fixed; therefore, the team must ensure the top surface is exactly flush. This step is crucial for maintaining accuracy.
In MoRTH specifications as well, accuracy in density measurement is of paramount importance; consequently, the team should not take the trimming process lightly.
Step 7: Weight Measurement
Now, the weight of the mold containing the compacted soil is measured. Subsequently, the weight of the empty mold is subtracted to determine the weight of the soil.
The weight measurement must be accurate, as the calculation of dry density depends entirely upon it. If the weighing scale is inaccurate, the entire test results could be rendered erroneous.
In accordance with IS 2720, weights are recorded meticulously, and distinct values are noted for each individual trial.
Density measurement constitutes a critical parameter in MoRTH projects as well, wherein the field density test results are compared against the Maximum Dry Density (MDD) established in the laboratory.
Step 8: Moisture Content Determination
A portion is taken from the compacted sample to determine its moisture content. For this purpose, the oven-drying method is employed, wherein the sample is dried at a temperature of 105–110°C.
To calculate the moisture content, the difference between the wet weight and the dry weight is determined. This value is crucial for every trial, as the compaction curve is constructed based on it.
According to the IS Code, moisture content determination is a standard procedure, and maintaining accuracy during this process is of utmost importance.
In accordance with MoRTH specifications, field moisture is also controlled to ensure that proper compaction is achieved.
Step 9: Dry Density Calculation
Now, the dry density is calculated using the obtained values. The dry density is derived by converting the wet density based on the moisture content.
A distinct dry density value is obtained for each trial. As the moisture content increases, the dry density initially rises and subsequently begins to decrease. This behavior is clearly evident in the compaction curve.
The dry density is calculated using the formula prescribed by IS 2720, and the results are properly tabulated.
This step is of paramount importance, as the final Maximum Dry Density (MDD) and Optimum Moisture Content (OMC) are derived from this very calculation.
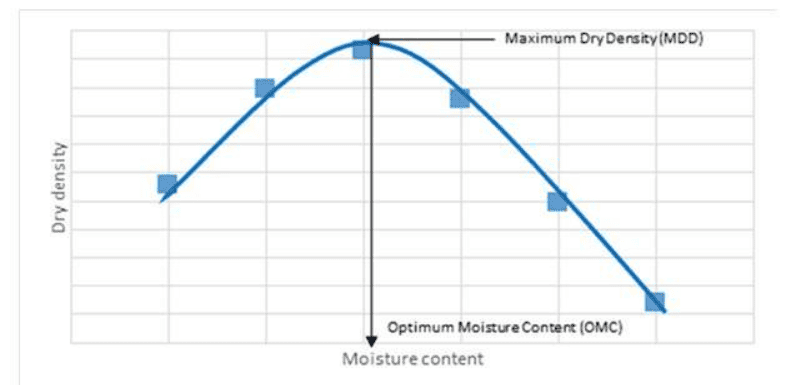
Step 10: Compaction Curve and Result
In the final step, a graph is plotted between moisture content and dry density. This graph is known as the compaction curve. The highest point of the curve represents the Maximum Dry Density (MDD), and the corresponding moisture content is termed the Optimum Moisture Content (OMC).
The Standard Proctor Test and the Modified Proctor Test yield distinct curves. In the Modified test, the curve shifts slightly, resulting in a higher MDD and a lower OMC.
According to MoRTH specifications, field compaction generally requires achieving 95% or 98% of the MDD, depending on the type of layer.
This final result is utilized for construction quality control and ensures that the soil has been properly compacted.
Conclusion
The Soil Proctor Test is a fundamental yet highly powerful tool in the field of civil engineering that aids in understanding the compaction behavior of soil. Through this test, we determine critical parameters such as Maximum Dry Density (MDD) and Optimum Moisture Content (OMC), which serve as the foundation for any construction project. If the soil is not subjected to proper compaction, future problems such as settlement, cracking, and structural failure may arise. Consequently, the role of the Proctor Test in quality control becomes absolutely crucial.
The primary difference between IS 2720 Part 7 (Standard Proctor Test) and IS 2720 Part 8 (Modified Proctor Test) lies in the compaction energy applied. The Standard Proctor Test is generally suitable for light compaction applications—such as embankments or low-traffic areas—whereas the Modified Proctor Test is utilized for heavy compaction conditions, such as those required for highways, runways, and industrial floors. Due to the higher energy applied in the Modified test, the soil achieves a greater density, thereby enhancing its load-bearing capacity.
According to MoRTH specifications, the results of the Modified Proctor Test are generally adhered to in road construction projects. Furthermore, field compaction is verified as a percentage of the MDD—for instance, requiring 95% or 98% compaction. This implies that it is mandatory to achieve a specific percentage of the laboratory-determined density within the actual field conditions. This practice ensures that the pavement layers remain robust and durable, thereby preventing future structural failures.
If you systematically follow the 10 steps outlined in this blog, you will obtain accurate and reliable results. Each step holds its own significance—whether it involves soil sample preparation, moisture control, or the specific compaction technique employed. An error at any stage could compromise the accuracy of the final result, thereby directly impacting the overall quality of the project.
Data derived from the Proctor Test is equally vital in practical field applications. Field density tests—such as the Sand Replacement Test or the Core Cutter Test—are invariably compared against the laboratory-determined MDD. If the density measured in the field falls below the required threshold, additional compaction is applied to achieve the desired standard. Thus, the Proctor Test serves as a bridge between the laboratory and the field.
Ultimately, it would not be incorrect to state that the Soil Proctor Test is not merely a laboratory procedure, but rather an essential engineering practice that contributes directly to the construction of safe, stable, and long-lasting structures. If you are a civil engineer or a student, possessing both a theoretical and practical understanding of this test is crucial, as it provides you with a strong foundation for handling real-world construction challenges.
About the Author
My name is Susanta Kumar Mohapatra. I am a civil engineering professional with over 11 years of practical experience in the construction and infrastructure sectors. I hold a B.Tech degree in Civil Engineering and an M.E. degree in Construction Management.
Throughout my career, I have worked in various areas such as road construction, bridge projects, quality control, material testing, quantity surveying, project planning, and site management. I am passionate about sharing practical knowledge related to highway engineering, laboratory testing, and construction management with engineers, students, and construction professionals.
I am the founder of CivilGuruHub.com, where I share technical articles, field experiences, laboratory test procedures, guidelines based on IRC and IS codes, and practical construction knowledge related to civil engineering. My aim is to explain civil engineering concepts in simple language and provide useful, reliable information to industry professionals.
You can connect with me through CivilGuruHub.com and my YouTube channel, “The Civil Site,” where I regularly share civil engineering tutorials and practical site knowledge.
FAQ
Q1. What is the Soil Proctor Test?
The Soil Proctor Test is a laboratory test used to determine the compaction characteristics of soil. Through this test, we determine the Maximum Dry Density (MDD) and the Optimum Moisture Content (OMC). Both of these parameters are crucial for construction purposes, as they indicate the specific moisture content and density to which the soil must be compacted to achieve maximum strength. This test is extensively utilized in road construction, embankment projects, and foundation works.
Q2. What are MDD and OMC?
MDD stands for Maximum Dry Density—that is, the highest dry density of a soil that can be achieved after compaction. OMC stands for Optimum Moisture Content—that is, the ideal water content at which the soil compacts most effectively. Simply put, OMC is the moisture content at which the MDD is attained. Both of these values are derived from the compaction curve and serve as a reference for field compaction operations.
Q3. What is the difference between the Standard Proctor Test and the Modified Proctor Test?
In the Standard Proctor Test (IS 2720 Part 7), the compaction energy is lower, utilizing a 2.6 kg rammer with a drop height of 310 mm. In the Modified Proctor Test (IS 2720 Part 8), the compaction energy is higher, utilizing a 4.9 kg rammer with a drop height of 450 mm. Consequently, the Modified Test yields a higher MDD and a lower OMC. For highway projects, the Modified Proctor Test is generally preferred.
Q4. Where is the Soil Proctor Test used?
This test is utilized in road construction, embankment construction, earth dams, subgrade preparation, and foundation work. According to MoRTH specifications, this test is mandatory for compaction control in highway projects. Quality control is performed by comparing the field density against the laboratory-determined MDD.
Q5. What is a compaction curve?
A compaction curve is a graph in which moisture content is plotted on the x-axis and dry density on the y-axis. The highest point on this curve represents the Maximum Dry Density (MDD), and the corresponding moisture content at that point is termed the Optimum Moisture Content (OMC). This curve aids in understanding the compaction behavior of the soil.
Q6. How is compaction checked in the field?
To verify field compaction, either the Sand Replacement Test or the Core Cutter Test is employed. These tests are used to determine the field density, which is then compared against the laboratory-derived MDD, typically expressed as a percentage. For instance, if the requirement is 95%, the field density must be at least 95% of the MDD.
Q7. What are the compaction requirements according to MoRTH specifications?
According to MoRTH specifications, there are distinct compaction requirements for different layers. Generally, the objective is to achieve 97% of the MDD for the subgrade and 98% of the MDD for GSB/WMM layers (based on the Modified Proctor Test). This ensures that the road structure is strong and durable.
Q8. How many trials are conducted during a Proctor Test?
Typically, 4 to 6 trials are performed, wherein the moisture content is varied in each instance. The results of all these trials are plotted to generate a compaction curve. The MDD (Maximum Dry Density) and OMC (Optimum Moisture Content) are determined from the peak point of this curve.
Q9. What problems arise if the soil’s moisture content is too high or too low?
If the moisture content is too low, the soil does not compact properly, leaving voids within the structure. Conversely, if the moisture content is excessively high, the lubrication between the soil particles increases, resulting in a reduction in density. Therefore, performing compaction at or around the OMC is the most effective approach.
Q10. Is the Proctor Test applicable to every type of soil?
The Proctor Test is primarily applicable to fine-grained soils and granular soils. However, it is not suitable for materials that are excessively coarse (such as boulders). In such cases, modified methods or correction factors are employed in accordance with the relevant IS codes.