
introduction:
Concrete plays a vital role for construction in civil engineering.
Its performance depends not only on strength but also on workability.
Workability defines, how easily concrete can be mixed, transported, placed, and compacted without segregation.
One of the most simplest commonly used methods to measure workability is Slump test.
This article will discuss many aspects of the slump test including,
The procedures to perform the test, the standard values of slump test and the applications of the slump test on construction sites.
Aim of Slump test
The main Objectives of slump test are:
- To determine the consistency of fresh concrete.
- To check the uniformity of concrete mix.
- For confirming, the concrete is suitable for placing and compaction.
- To maintain quality of concrete at site
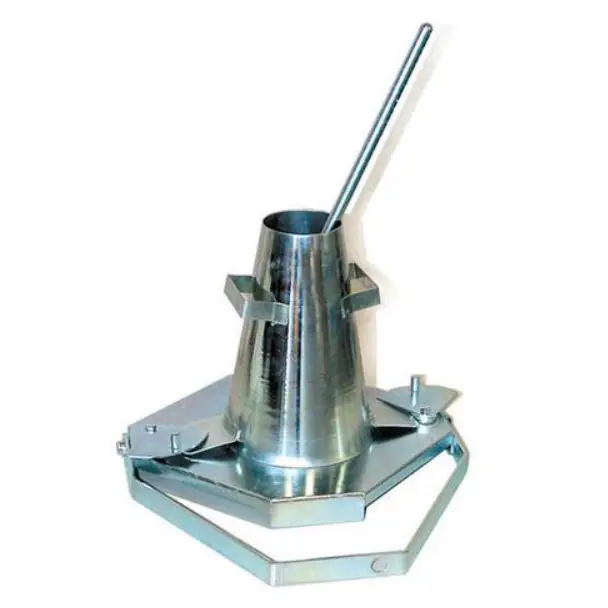
Apparatus Required
The following apparatus used in the slump test:
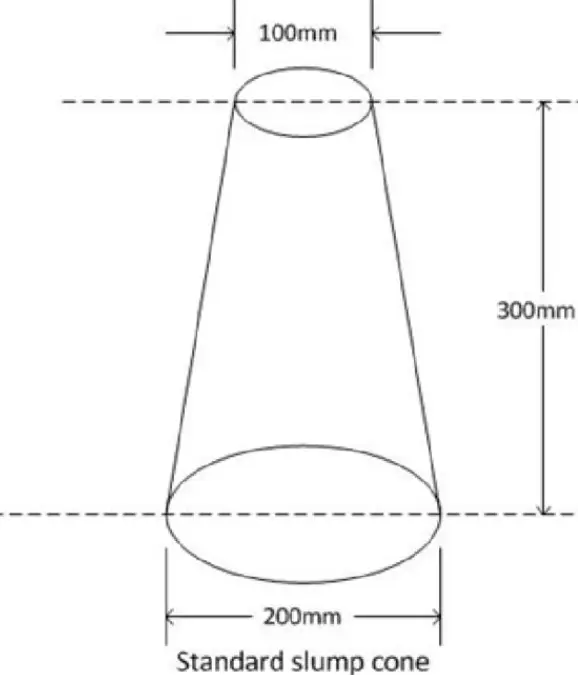
- Slump cone (Height = 300(+/- 2) mm, Bottom diameter = 200(+/- 2) mm, Top diameter = 100(+/- 2) mm)
- Base plate.
- Tamping Rod (16(+/- 1) mm diameter, 600(+/- 5) mm length)
- Measuring scale
All details about Retaining wall and Toe wall, you can find here.
what is Retaining Wall and Its Type: Complete Guide
Toe Wall in Civil engineering : A complete guide
Standard Reference
In India, the slump test is conducted as per guidelines given by,
IS 1199 Part 2:2018
Slump Test Procedure (Step-by-Step)
Now let’s understand the actual site procedure, which is very important for both exams and practical work.
Step 1: Preparation
- At first clean the slump cone and base plate by water.
- Place the cone on a level and non-absorbent surface.
- Hold it firmly to prevent movement
Step 2: Filling the cone
- Fill the slump cone by three equal layer
- All layers are calculated by one third of the cone.
Step 3: Tamping
- Each layer is tamped twenty five using a tamping rod.
- Ensure uniform compaction.
- Confirm that every layers are interconnected.
Step 4: Leveling
- Remove excess concrete from the top.
- Now level the top.
Step 5: Lifting the Cone
- Carefully lift the cone vertically upward in 5–10 seconds
Step 6: Measurement
- Measure the difference between original height (300 mm) and the slumped concrete height
- This difference is called Slump Value (in mm)
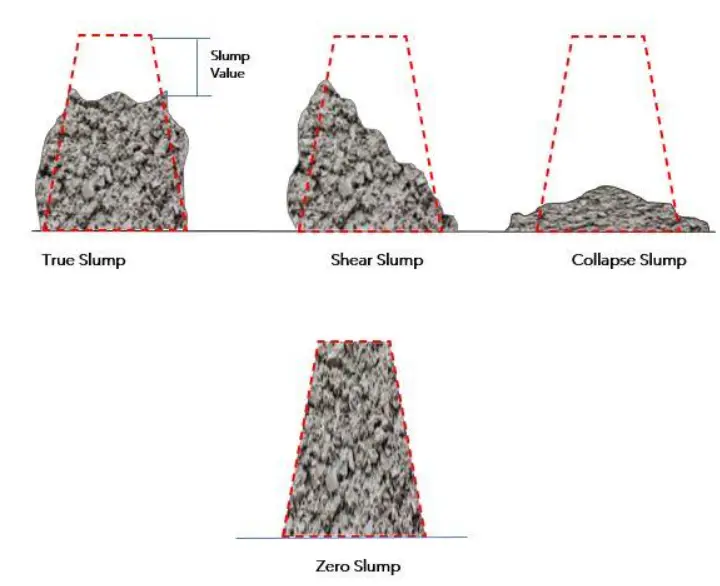
Types of Slump
Understanding slump types is very important because it tells you about concrete behavior.
True Slump :
- Concrete subsides uniformly
- Indicates good workability
- Best type of slump
Shear Slump :
- One side of concrete slides
- Indicates lack of cohesion
- Mix needs correction
Collapse Slump :
- Concrete completely collapses
- Indicates very high water content
- Not suitable for structural work
Safety and Precautions in Slump Test
- When performing a slump test, safety and proper precautions are as important as following the procedure. Often, workers perform testing hastily on site, which not only results in inaccurate results but also increases the risk of accidents.
- First, ensure that the base plate is placed on a stable and level surface. If the surface is uneven, the slump value will not be accurate.
- It is important to wear gloves and safety shoes when handling concrete, as wet concrete can be harmful to the skin.
- When lifting the slump cone, lift it slowly and vertically. If you lift the cone with a jerk, the concrete will be disturbed, preventing an accurate slump measurement.
- Also, apply uniform force when you use the tamping rod to ensure each layer is properly compacted.
- Finally, position the scale correctly when measuring and take the reading.
- Only by following these precautions can we obtain an accurate and reliable slump test result.
Slump Value and Its Meaning
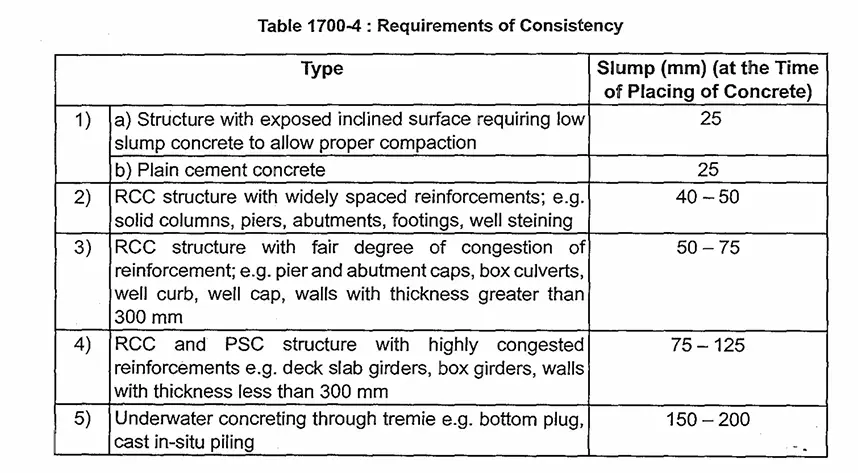
As per above image collected from MoRTH 5th revision and Section 1700 table no. 4, required slump for every item are given
For each type of Concrete like PCC, RCC, PSC etc., there are different slump measurement given in above image collected from MoRTH 5th Revision.
In case of PQC the slump for M-40 grade concrete must be 25 (+/-15) mm as per MoRTH 5th revision section 600 and clause 602.3.4.2

Factors Affecting Slump
- Water-cement ratio.
- Aggregate size and shape.
- Temperature.
- Mixing time.
- Admixture content.
Note: More water = High slump, More Flakiness of aggregate = Low slump
Relation between Slump Test and Workability
Workability is a broad term that includes many factors such as flowability, compactability, and finishability. Slump testing provides an indirect indication of all of these.
Low slump means low workability, which may be acceptable for mass concrete or road work. However, RCC structures such as beams, slabs, and columns require medium to high workability.
High slump is suitable for concrete pumping, but controlling it is crucial.
Thus, slump testing helps us decide which concrete will be best for which structure.
Slump Test vs Other Workability Tests
The slump test is the most popular test, but it is not sufficient in some cases.
- For very dry concrete, the slump test is ineffective; the engineers uses the Compaction Factor Test.
- For self-compacting concrete (SCC), the engineer uses the Slump Flow Test.
- The Vee-Bee Consistometer Test is also used for low-workability concrete.
- Therefore, the engineer must choose the appropriate test based on the situation.
Effect of Admixtures on Slump
- The use of admixtures has become very common in construction today.
- Using a superplasticizer can increase slump without increasing water.
- Retarder admixture increases the setting time of concrete, making long-distance transportation possible.
- Accelerators reduce setting time, but have an indirect effect on slump.
- Therefore, both workability and strength can be optimized by using admixtures correctly.
Effect of Temperature on Slump
- Temperature also significantly affects slump value.
- In high temperatures, water evaporates faster, reducing slump.
- In low temperatures, the hydration process is slower, causing slump to persist for a comparatively longer period of time.
- Therefore, extra precautions are necessary for hot weather concreting, such as using chilled water or admixtures.
Conclusion
Concrete quality plays a major role in the strength, durability, and long-term performance of any structure. For this reason, engineers and construction professionals must ensure that fresh concrete possesses the required workability before it is placed and compacted. Among the various methods available for evaluating workability, the slump test is considered one of the simplest, quickest, and most practical procedures used on construction sites. It provides an immediate indication of the consistency of fresh concrete and helps engineers determine whether the concrete mix is suitable for the intended application.
Regular testing helps maintain uniformity in concrete production and ensures that variations in water content, aggregate properties, mixing time, or admixture dosage can be identified at an early stage. By conducting this test, site engineers can take corrective actions before the concrete is placed, thereby reducing the risk of honeycombing, segregation, poor compaction, and other quality-related issues. As a result, the overall performance and durability of the structure can be significantly improved.
Understanding the correct testing procedure, interpretation of results, and different types of concrete behavior is essential for students, site supervisors, quality control engineers, and construction professionals. Proper execution of the test also requires attention to safety measures, accurate measurement techniques, and adherence to relevant standards such as IS 1199 Part 2:2018.
In modern construction projects, quality control has become more important than ever. A small deviation in concrete workability can affect the ease of placement and ultimately influence structural performance. Therefore, routine workability testing should always be an integral part of construction practices. By following standard procedures and evaluating results correctly, engineers can ensure better quality control, improved construction efficiency, and the successful completion of durable and reliable concrete structures.
About the Author
My name is Susanta Kumar Mohapatra. I am a civil engineering professional with over 11 years of practical experience in the construction and infrastructure sectors. I hold a B.Tech degree in Civil Engineering and an M.E. degree in Construction Management.
Throughout my career, I have worked in various areas such as road construction, bridge projects, quality control, material testing, quantity surveying, project planning, and site management. I am passionate about sharing practical knowledge related to highway engineering, laboratory testing, and construction management with engineers, students, and construction professionals.
I am the founder of CivilGuruHub.com, where I share technical articles, field experiences, laboratory test procedures, guidelines based on IRC and IS codes, and practical construction knowledge related to civil engineering. My aim is to explain civil engineering concepts in simple language and provide useful, reliable information to industry professionals.
You can connect with me through CivilGuruHub.com and my YouTube channel, “The Civil Site,” where I regularly share civil engineering tutorials and practical site knowledge.
FAQ About Slump Test
1. What is a Slump Test?
The Slump Test is a simple and widely used test to measure the workability and consistency of fresh concrete. It indicates how easy it will be to mix, transport, place, and compact the concrete.
2. Why is the Slump Test performed?
The primary objective of the Slump Test is to check the workability of fresh concrete, verify the uniformity of the mix, and ensure the concrete is suitable for placement and compaction.
3. What is the standard size of a Slump Cone?
The standard dimensions of a Slump Cone are: height 300 mm, bottom diameter 200 mm, and top diameter 100 mm. In India, these dimensions are followed in accordance with IS 1199 Part 2:2018.
4. How many layers are filled during the Slump Test?
In the Slump Test, the cone is filled in three equal layers. Each layer is compacted 25 times using a tamping rod to ensure proper compaction.
5. How is the Slump Value determined?
After lifting the cone vertically, the difference in height between the original level of the concrete and its subsided level is measured. This difference is known as the slump value and is expressed in millimeters (mm).
6. What are the different types of slump?
There are primarily three types of slump:
True Slump
Shear Slump
Collapse Slump
True Slump is considered the best as it indicates good workability of the concrete.
7. What do High Slump and Low Slump mean?
High Slump indicates high workability and is suitable for pumped concrete. Low Slump indicates low workability and is used in applications such as road construction or mass concrete work.
8. Which factors affect the slump value?
The slump value is influenced by the water-cement ratio, aggregate size and shape, temperature, mixing time, and admixtures. Generally, adding more water increases the slump value.
9. Does the Slump Test indicate the strength of the concrete?
No, the Slump Test does not directly measure concrete strength. It only measures the workability and consistency of fresh concrete. A compressive strength test is conducted to determine strength.
10. How important is the Slump Test at the construction site?
The Slump Test is a crucial part of quality control at a construction site. It allows the engineer to immediately determine whether the concrete mix meets the required workability standards, thereby ensuring the quality and durability of the structure.
11. What should be the ideal slump value for RCC?
Concrete with medium workability is typically used for RCC structures such as beams, slabs, and columns; the slump value for this generally ranges from approximately 75 mm to 125 mm. The exact value depends on project specifications and site conditions.
Pingback: How to Calculate HPC Concrete Quantity step by step
Pingback: FDD test: what is it? complete gprocess and calculation.
Pingback: what is Juran’s Trilogy of Quality : Explained Simply